# CORE I/O
# Basics
# Basics
### CORE I/O
[](https://secretlibrary.rccf.club/uploads/images/gallery/2023-08/ziFkxyTRD5jNAtsH-rtaimage.jpg)
# Network
### Connecting through SPOT
The Spot CORE I/O can also be set up to use Spot as a router in order to access the internet if Spot is connected. When the default route of the Spot CORE I/O is set to 192.168.50.3 (Spot), it can access the same networks as the robot. See the knowledge article [Spot CORE: Accessing the Internet through Spot](https://support.bostondynamics.com/s/article/Spot-CORE-Accessing-the-Internet-Through-Spot) for more details (this article is for the legacy Spot CORE, but will also apply to the Spot CORE I/O).
The Spot CORE I/O does not have Cockpit. Network configuration sections referring to Cockpit should be done through the terminal instead of using the "nmcli" command line tool. The following commands will set the Spot CORE I/O's Gateway to Spot:
```bash
sudo nmcli connection modify eth-robot ipv4.gateway "192.168.50.3"
sudo nmcli c up eth-robot
```
# Bare Minimum code to control spot
## DISCLAIMER:
This documentation is still a work in progress. I will find ways to make this article and the code provided more efficient. If there are any errors you encounter please reach me by my discord: bookis.
##
Introduction:
Once you have established a working connection with SPOT and run a few of the Boston Dynamic (BD) scripts, you will probably want to write your scripts for Tape Measure. This article will show you how to create a simple standing script which will hopefully help you understand SPOT programming.
When writing your scripts for SPOT, you need to ensure your code has three things:
1. The IP, username, and password for SPOT.
2. Establish the E-Stop.
3. Claim the lease.
#### Imports:
```python
from bosdyn.geometry import EulerZXY
import bosdyn.client
from bosdyn.client.robot_command import RobotCommandClient, blocking_stand #Ignore this for now !!
from bosdyn.client.robot_command import RobotCommandBuilder
```
The bosdyn.client library is what will carry the bulk of the commands needed for you to complete the three aforementioned requirements to control SPOT.
#### Initializing the robot:
```python
sdk=bosdyn.client.create_standard_sdk('test')
robot= sdk.create_robot('ip address')
robot.authenticate("username","password") #ASK DWIGHT FOR THE LOG IN INFORMATION AND IP ADDRESS
state_client=robot.ensure_client('robot-state')
```
The code above is the basics of initializing the robot. The first line is where you access the sdk needed to reach the create\_robot object you need not worry too much of what you put into the parameter (at least from what I understand). After accessing the create\_standard\_sdk object you need to call the "create\_robot" object within the sdk and assign it to a variable (In my case its called "robot"). This variable is where you will be conducting a bulk of the commands needed to access SPOT's data and eventually be able to control him. You can test that you have access to him by typing the command below.
```python
print(state_client.get_robot_state())
```
Now if you only need to get sensor data, this is the furthest extent of what you need to acquire such data. However, if you would like to physically control SPOT you need to initialize the estop and then acquire the lease for the SPOT.
#### Estop:
BD placed safety protocols that need to be done before you are allowed to physically control SPOT. The first step is initializing the estop.
```python
estop_client=robot.ensure_client('estop')
estop_endpoint= bosdyn.client.estop.EstopEndpoint(client=estop_client,name='my_estop',estop_timeout=9.0)
estop_endpoint.force_simple_setup()
estop_keep_alive=bosdyn.client.estop.EstopKeepAlive(estop_endpoint)
estop_client.get_status()
```
This is the code that's needed to initialize the estop. BD has it set up where you only need to call the get\_status() object to be called to ensure that the estop has been initialized. To do that you need to ensure that there is an estop endpoint established and you need to have an estop client variable.
#### Acquiring the Lease:
The code below is what is needed to acquire the lease. Like with the estop, you only need to call the acquire() object inside of the lease client to get the lease.
NOTE: This will not forcibly take a lease from another device. If there is another device that is taking control of the robot make sure to release the lease in that device BEFORE you forcibly take the lease.
```python
lease_client=robot.ensure_client('lease')
lease_client.list_leases()
lease=lease_client.acquire()
lease_keep_alive=bosdyn.client.lease.LeaseKeepAlive(lease_client)
lease_client.list_leases()
```
#### Making SPOT Stand:
Now after completing the previous steps, you should have everything you need to actually control SPOT. For the sake of simplicity, I condensed acquiring the lease and estop initializing into functions.
```python
estopInilization() #This is what you did in the estop step
acquireLease() #This is what you did in the acquiring the lease step
robot.power_on(timeout_sec=20)
robot.is_powered_on()
robot.time_sync.wait_for_sync() # You need to sync the time thats on SPOT with the system time on your device.
```
This next bit of code is going to be how you usually issue commands to SPOT. There are three steps that you need to do to issue commands to SPOT.
1\) Create a command client.
2\) Create the command.
3\) Issue the command to the command client.
You will repeat steps 2 and 3 as necessary if you are trying to issue different commands.
```python
command_client=robot.ensure_client(RobotCommandClient.default_service_name) #Step 1
cmd=RobotCommandBuilder.synchro_stand_command(footprint_R_body=footprint_R_body) #Step 2
command_client.robot_command(cmd) #Step 3
```
It's important to keep in mind that most of SPOTs commands will have a similar format. Whether it is to move or get a camera feed you need to create a client, request, then execute.
#### Full Code:
```python
from bosdyn.geometry import EulerZXY
import bosdyn.client.robot_command
from bosdyn.client.robot_command import RobotCommandClient
from bosdyn.client.robot_command import RobotCommandBuilder
footprint_R_body = EulerZXY(yaw=0.1, roll=0.0, pitch=0.0)
def intilizeBot ():
sdk=bosdyn.client.create_standard_sdk('test')
robot= sdk.create_robot('ASK DWIGHT FOR IP')
robot.authenticate("USER","PASSWORD") #ASK DWIGHT FOR PASSWORD AND USERNAME
state_client=robot.ensure_client('robot-state')
state=state_client.get_robot_state()
return robot
def estopInilization():
estop_client=robot.ensure_client('estop')
estop_client.get_status()
estop_endpoint= bosdyn.client.estop.EstopEndpoint(client=estop_client,name='my_estop',estop_timeout=9.0)
estop_endpoint.force_simple_setup()
estop_keep_alive=bosdyn.client.estop.EstopKeepAlive(estop_endpoint)
estop_client.get_status()
def acquireLease():
lease_client=robot.ensure_client('lease')
lease_client.list_leases()
lease=lease_client.acquire()
lease_keep_alive=bosdyn.client.lease.LeaseKeepAlive(lease_client)
lease_client.list_leases()
robot=intilizeBot()
estopInilization()
acquireLease()
robot.power_on(timeout_sec=20)
robot.is_powered_on()
robot.time_sync.wait_for_sync()
command_client=robot.ensure_client(RobotCommandClient.default_service_name)
robot.start_time_sync()
cmd=RobotCommandBuilder.synchro_stand_command(footprint_R_body=footprint_R_body)
command_client.robot_command(cmd)
```
# Extensions
This is a group of guides on how to create extensions.
# How to build an extension
### Running Test Containers
#### **TODO.**
We have included .bat files that show the process of building Docker images using our scripts and then running those images as containers. If you having trouble getting the concepts down, try using the Docker Desktop GUI to get a hang of the workflow. After you get what you want running in the GUI, select the options icon next to the container's play button, select 'Copy docker run', and paste that into any text editor to see the command that was used to run the container. This is a helpful way to see some of the MANY docker options in action.
Extensions are either one image [built using their tutorial](https://dev.bostondynamics.com/docs/payload/docker_containers) or a set of docker images. They are composed of (a minimum of 3) essential files.
1. docker-compose.yml
2. manifest.json
3. [extension_name].spx
4. (optional) udev.rules
5. (optional) Additional device files
6. (optional) icon.png
The spot-sdk includes at least one example. See python/examples/[spot\_detect\_and\_follow](https://dev.bostondynamics.com/python/examples/spot_detect_and_follow/readme). It includes all the necessary files (and more).
Testing and building are much easier if you have set the BOSDYN_CLIENT_USERNAME and BOSDYN_CLIENT_PASSWORD Windows environment variables to Spot's credentials. This is necessary to auto-login credentials. You can also hardcode them into the Dockerfiles (ENV BOSDYN_CLIENT_USERNAME=[username] / ENV BOSDYN_CLIENT_PASSWORD=[password]), but this won't work when the extension is made and pushed to Spot, only when the container/compose is running locally. We have instead written our BAT files to pass in the GLOBAL environmental variables to set them on the Linux system.
1. Build individual image files for each service you want to run on Spot. See senseable/ping\_image/build\_docker\_ARM64.
- Make sure global environment variables are set for BOSDYN\_CLIENT\_USERNAME and BOSDYN\_CLIENT\_PASSWORD. These are passed into the Linux environment during the container build process.
- Have to build for ARM64 if on Windows. Docker buildx and docker run lines run something which I believe is a multi-architectural development environment. You then run this and use it to build the ARM64 image.
- This image is saved as a .tgz file for later packaging together with others. Cab uses senseable/ping\_image/run\_docker\_ARM64 to test this ARM64 image on your Windows PC.
2. Create a new directory for your extension. Copy-paste the image file (.tgz) into it.
3. Add a new blank file named docker-compose.yml to this new directory.
- This is the core that ties together your Extension. Seems a little leaner than how it's usually used for Docker Compose. The understanding is regular Docker Compose workflows build and cobble the images together all at once, while here it just cobbles together pre-existing images. Ours is lean. Use it to specify where the images are located and other arguments you would normally pass into the command line or Docker GUI when making a container out of an image. Here our image is in the directory already, so we just give it the file name (WITHOUT the .tgz part)
4. Add a new blank file named manifest.json to this directory
- This JSON file is essentially metadata about your extension. The essential components seem to be description, version number, and images. All are strings, except images which is a list of strings (including file names).
- You can test this locally on Windows using the 'local\_create\_and\_run\_extension.bat' file.
5. Compile this directory into a .spx extension file.
- This is essentially a .tar with a different file extension name. Pass in the essential files, or just a \* at the end to include the entire directory. NOTE: The name of this file will be the name of the extension.
6. Access the CORE IO admin console
- Select Spot Web Portal > Payloads, then click on the CORE link to edit your CORE IO payload. Then scroll to the bottom and select 'Open CORE I/O Admin Console'. Add your extension there.
7. Run on SPOT and test :)
### Writing to Directories Outside of a Container
You'll need to specify the volume of the data directory on Spot. These can also be used to pass data back and forth between containers. In the .yml file, add an additional section for your image that's doing the writing. In the example below, we will have our scripts write to the local directory 'data-directory-in-container' that is inside the container, and these changes will be reflected in the persistent 'data' directory of the CORE IO.
SSH into Spot. Launch your extension via the online portal. Then run 'sudo docker container list' to view current containers. Then run 'sudo docker attach [YOUR_CONTAINER_NAME]' to attach the container terminal to the ssh cmd. This should print Python outputs to the console. TODO mentions the bash.
#### Misc. Encountered Errors
Attempting to run our network test script resulted in the following error on the container running on Spot during the authentication process:
```bash
File "/spot_image.py", line 58, in get_image
bosdyn.client.util.authenticate(robot)
File "/usr/local/lib/python3.8/site-packages/bosdyn/client/util.py", line 84, in authenticate
robot.authenticate(username, password)
File "/usr/local/lib/python3.8/site-packages/bosdyn/client/robot.py", line 349, in authenticate
user_token = auth_client.auth(username, password, self.app_token, timeout=timeout)
File "/usr/local/lib/python3.8/site-packages/bosdyn/client/auth.py", line 115, in auth
return self.call(self._stub.GetAuthToken, req, _token_from_response, _error_from_response,
File "/usr/local/lib/python3.8/site-packages/bosdyn/client/common.py", line 275, in processor
return func(self, rpc_method, request, value_from_response=value_from_response,
File "/usr/local/lib/python3.8/site-packages/bosdyn/client/common.py", line 387, in call
raise translate_exception(e) from None
bosdyn.client.exceptions.ProxyConnectionError: ProxyConnectionError: The proxy on the robot could not be reached.
```
It appears this issue is due to SPOT running on external wifi. CORE IO authentication only seems to work when running on Spot's own Wi-Fi network. TODO confirm this and add it to the section above
---------------------------
NOTE: If you run into an error related to 'invalid JSON response' on the Extensions Web portal, it likely means you uploaded an extension with an invalid component in the .yml file.
It happened to us when we went from this (function):
After rebuilding and re-uploading with the original .yml, everything on the web portal went back to normal.
# What is an Extension?
#### Boston Dynamics explanation of an Extension
Extensions are software packages or static files introduced in 3.2 that can be installed or simply uploaded to the CORE I/O or Scout platforms.
Configured as software packages, Extensions provide the functionality for external developers to easily install applications onto CORE I/O and Scout platforms. On the CORE I/O, these software packages can integrate a newly-mounted payload with the Spot API, or not be associated with any payload functionality at all, such as uploading data to an AWS bucket.
Extensions can also simply be static files that developers need to upload into the CORE I/O or Scout platform. This configuration supports two important use cases:
1. It allows the developers to split their Extensions into smaller Extensions with the software components that need to be updated frequently and one or more larger Extensions with static files needed by the Extension with the software component. This configuration simplifies the process of updating Extensions by decoupling static large files from the frequently updatable files and installing them once, or less frequently.
2. It allows the developers to split their Extensions into a generic software package that is identical for all customers, and separate Extensions with configuration files that are applicable to one of a subset of customers. This configuration simplifies the process of installing customer-specific Extensions by maintaining the common part of the package in one Extension and the customer-specific configuration in another Extension.
#### Our Explanation of an Extension
Extensions are a packaged group of software that we can use to run different docker images on SPOT. Each Extension can contain one or more docker images that are used to interface with hardware or perform computational tasks. This package format allows you to easily develop software on external machines and upload your complete package to the CORE I/O.
This setup is very similar to Docker's compose method. In fact, they even use docker-compose for running the services.
Extension files end in a .spx format and contains the following files:
- manifest.json
-
docker-compose.yml
-
[extension_name].spx
-
(optional) udev.rules
-
(optional) Additional device files
-
(optional) icon.png
##### manifest.json
Contains the description and list of files to include in an extension.
Example:
```json
{
"description": "SENSEable Design Lab test.",
"version": "0.1",
"icon": "icon.png",
"udev_rules": "senseable_udev.rules",
"images": ["example.tgz"]
}
```
##### docker-compose.yml
Contains the docker-compose files that builds and configures the docker files included in the extension.
Example:
```yaml
services:
ping_test:
image: ping-test-dockerization-arm64
ports:
- "21002:21002"
```
##### udev.rules
##### additional device files
##### icon.png
# ROS 2
# Extension
[Following the documentation here](https://github.com/rshu-bd/spot_ros2/tree/rshu-bd/spot_core_extension/spot_coreio_extension)
## [Build The Extension](https://github.com/rshu-bd/spot_ros2/tree/rshu-bd/spot_core_extension/spot_coreio_extension#build-the-extension)
This directory contains a script create\_extension.sh that can be used to create an l4t-based Spot Extension for this example. This will create a file spot\_detect\_and\_follow.spx, which can be uploaded to the CORE I/O. The extension requires that the payload be authorized on the robot admin console to run.
If building on a host system architecture that is not `ARM64` based run the following before continuing.
```bash
sudo apt-get install qemu binfmt-support qemu-user-static
```
Installing and running qemu will allow us to build ARM binaries on an x86 machine without needing a cross compiler, see [Build Docker Images Documentation](https://dev.bostondynamics.com/docs/payload/docker_containers#build-docker-images) for more details.
This directory contains a script `create_extension.sh` that can be used to build a `ARM64` docker image and package all the files into an Extension. From the `ros2_driver` directory run the script
```bash
./create_extension.sh
```
This will create the `spot_ros2_driver.spx` extension file that you can upload to the CORE I/O or Scout platform. The script was tested on Ubuntu 22.04 with x86 architecture.
---
Before you install and run the `spot_ros2_driver.spx` you need to configure the port range used by a connection in the CORE I/O to be within the allowable port range.
### [Limit the ports used by a connection in the CORE I/O](https://github.com/rshu-bd/spot_ros2/tree/rshu-bd/spot_core_extension/spot_coreio_extension#limit-the-ports-used-by-a-connection-in-the-core-io)
SSH into the CORE I/O from the robot’s WiFi
```bash
ssh -p 20022 spot@192.168.80.3
```
Make a copy of the default port range (not currently working with our CORE io)
```bash
cat /proc/sys/net/ipv4/ip_local_port_range > /proc/sys/net/ipv4/ip_local_port_range.bak
```
The default configuration of the ip\_local\_port\_range
```bash
32768 60999
```
Limit the ports a networking connection can use to those reachable through the CORE I/O's firewall
```bash
echo "21000 22000" | sudo tee /proc/sys/net/ipv4/ip_local_port_range
```
This will force all connections from the CORE I/O to be on the port range 21000 - 22000.
# ROS2 Container to container communication
### To-Do
- Determine why multicast send and receive are not working on our network.
- More testing with other ROS2 packages.
### Setup
In this setup, we have two containers:
1. The Boston Dynamics ROS2 [Spot ROS2](https://github.com/rshu-bd/spot_ros2/tree/rshu-bd/spot_core_extension) container in the an extension file build using [these instructions](https://github.com/rshu-bd/spot_ros2/tree/rshu-bd/spot_core_extension/spot_coreio_extension).
2. Our container built for Spot.
### Network
### Container Configuration
##### Extension Container
1. You need to ssh into the CORE I/O via the default IP of 192.168.80.3 or 192.168.50.3 if you are connected directly to the CORE I/O.
- ```bash
ssh 192.168.80.3
```
2. You will need to lock down the CORE I/O to a specific port range. This is so that the containers choose ports that are open.
- ```bash
echo "21000 22000" | sudo tee /proc/sys/net/ipv4/ip_local_port_range
```
3. **You must restart the containers/extension after changing the ports on the CORE I/O**
4. You need to find the container id of your ROS2 installation.
- ```bash
sudo docker container ls
```
1. Once you have your container id you will need to open up into the container.
- ```bash
sudo docker exec -it 8966bcde886b /bin/bash # replace "8966bcde886b" with your container id
```
2. Once inside the container.
- The Extension container was setup with the following commands to test:
```bash
ping 192.168.50.20 # Ping test the dev computer.
export ROS_DISCOVERY_SERVER=192.168.50.5:21000 # This was changed from the BD default of 192.168.80.3 because we are using our own WiFi setup that bypasses Spot's internal network.
source ./install/setup.bash # Source workspace
source /opt/ros/humble/setup.bash # Source ROS2
ros2 run demo_nodes_cpp listener --ros-args --remap __node:=listener_discovery_server
```
##### Dev Container
The Dev container was setup with the following commands to test:
```bash
ping 192.168.50.5 # Ping test the CORE I/O.
export ROS_DISCOVERY_SERVER=192.168.50.5:21000 # This was changed from the BD default of 192.168.80.3 because we are using our own WiFi setup that bypasses Spot's internal network.
source ./install/setup.bash # Source workspace
source /opt/ros/humble/setup.bash # Source ROS2
ros2 run demo_nodes_cpp talker --ros-args --remap __node:=talker_discovery_server
```
# Docker
# Ubuntu Example
## Windows 10/11
(using docker desktop and WSL)
### Step 1 (install Docker desktop)
Please download and install the Docker desktop program from the [Docker website. ](https://www.docker.com/products/docker-desktop/)
Please make sure you check the box for installing WSL2!
[](https://secretlibrary.rccf.club/uploads/images/gallery/2023-10/hK6fUzYDswPWAXJ9-wjy7lbq.jpg)
Once it has finished installing you will be asked to log out of Windows! So make sure that you have saved everything you were working on.
### Open Docker Desktop and pull the latest Ubuntu image
Once the Docker desktop has finished its startup sequence you will need to pull the latest Ubuntu image. To do this go to the search bar at the top of the Docker Desktop window and search for "Ubuntu".
# Basics of Docker - Files, Images, & Containers
## Docker
Let's start off with a common question, what exactly is Docker? In textbook terms, Docker enables you to separate your applications from your infrastructure so you can deliver software quickly. That probably means nothing to you so let's simplify it and break it down for you. In simple terms Docker allows you to recreate an operating system or the software environment your program runs in. That means you no longer have to worry about a program not working on another machine when it works natively on yours. It's also this environment recreation that gives the most headaches as you'll find out in later chapters.
## Basic Concepts
Docker files are the first step in many to using Docker. In essence, docker files are like the instructions for building the perfect software environment for your program to run in. It tells Docker what programs, dependencies, and/or repositories should be in a Docker container.
Docker images are basically the bare-bones OS your program needs to run. This could be Ubuntu Linx or something entirely different, a good rule of thumb to go with is to use whatever OS (image) your program natively runs in. You can find all official support images (OS) [here](https://hub.docker.com/search?image_filter=official&q=&type=image).
Containers are what the docker files make after you run the build command on a docker file (more on that in another page). This is the environment your program is going to be in and is often almost completely isolated from the rest of a host system (more on that later).
## Docker Prerequisites
As I've alluded to earlier Docker allows you to replicate the environment your program runs in, so that begs the question, how exactly am I supposed to do that? First things first you'll need Docker to run Docker, if you're on Windows or Mac you'll be basically forced to use [Docker Desktop](https://www.docker.com/products/docker-desktop/), if you're on Linux I recommend you install [Lazy Docker](https://github.com/jesseduffield/lazydocker#installation). If its native documentation is confusing you can watch and follow this [guide ](https://www.youtube.com/watch?v=xb99lgO5Mw0&t=1082s)starting at 18:09 or email me at [caicheng\_li@yahoo.com](mailto:caicheng_li@yahoo.com). Other than that you'll need code editing software such as [Visual Studio Code](https://code.visualstudio.com/download) (VS Code). Be sure to install the Docker extensions if you're going with VS Code.
### Basic Info, Format, & Usage Examples
The default filename to use for a Dockerfile is `Dockerfile`, without a file extension. Using the default name allows you to run the `docker build` command without having to specify additional command flags. You can create one by starting a new file in your programming software and saving it as "Dockerfile" with no '.' or any other extensions.
That's it for the prerequisites let's get into how to actually create a docker file. The basic format of any docker file consists of the following functions: FROM, WORKDIR, RUN, COPY, and CMD. There are other more specialized functions for docker files such as ARG and ENV, however, for the purpose of this documentation, we won't be going over that. For the full list and explanation of docker files in its entirety go [here](https://docs.docker.com/build/building/packaging/#dockerfile-syntax). Other than that here's the simplified rundown of these functions:
Lets you define the default program that is run once you start the container based on this image. Each Dockerfile only has one `CMD`, and only the last `CMD` instance is respected when multiple exist.
That's great but how are they set up?
#### FROM <Image>
Images are what come after "FROM" and define the base OS for your program. For example, if you've written a program that works in Ubuntu you can do the following:
```dockerfile
FROM ubuntu:22.04
```
The [`FROM` instruction](https://docs.docker.com/engine/reference/builder/#from) sets your base image to the 22.04 release of Ubuntu. All instructions that follow are executed in this base image: an Ubuntu environment. The notation `ubuntu:22.04`, follows the `name:tag` standard for naming Docker images. When you build images, you use this notation to name your images. There are many public images you can leverage in your projects, by importing them into your build steps using the Dockerfile `FROM` instruction.
[Docker Hubopen\_in\_new](https://hub.docker.com/search?image_filter=official&q=&type=image) contains a large set of official images that you can use for this purpose.
#### RUN <Command>
The following line executes a build command inside the base image.
```dockerfile
# install app dependencies
RUN apt-get update && apt-get install -y python3 python3-pip
```
This [`RUN` instruction](https://docs.docker.com/engine/reference/builder/#run) executes a shell in Ubuntu that updates the APT package index and installs Python tools in the container. Basically, this function acts as you typing in a terminal in your host system. Whatever program, repositories, or dependencies you install using commands like pip install or apt-get install is run using this function.
#### WORKDIR <directory>
This function simply acts as the cd command in so many terminals. It tells the docker where to install or copy programs you ask of it. Below is a common example of the WORKDIR command.
```dockerfile
WORKDIR /app
```
#### Copy <src> <dest>
The `COPY` instruction copies new files or directories from `` and adds them to the filesystem of the container at the path ``. By default Copy copies the `` files into whatever WORKDIR you're currently in, however, you can specify an existing directory or `` to use.
```dockerfile
COPY tm-voicebox-v.3.7.4.py /app/tm-voicebox-v.3.7.4.py
```
In the above context, we're copying a local file titled "tm-voicebox-v.3.7.4.py" to the directory "/app/" set previously.
#### CMD \[<command>\]
Like RUN this function runs a terminal command, however, this is where the similarities end. CMD is usually used at the end of a docker file to specify how the user is going to interact with the program. For example:
```dockerfile
CMD ["python", "/app/tm-voicebox-v.3.7.4.py"]
```
The above represents the execution of a Python script located at "/app/tm-voicebox-v.3.7.4.py" right when the docker file is run, more on that on another page. But you can also access the actual terminal within the docker container by ending the docker file with:
```dockerfile
CMD ["bin/bash/"]
```
This allows the user access to the docker contain and can be useful for troubleshooting and development purposes.
# Building, Running, & Packaging Dockerfiles
This page is on what to do after you've created your docker file and how to run and package it to be uploaded.
This page assumes your knowledge and understanding of Dockerfiles, how to create them properly, and general command line knowledge.
## Building Docker Files
To build a docker file you need to utilize docker build commands. Before anything you have to make sure you're within the directory of your docker file. To do this simply right-click on the folder containing your docker file and "open in terminal" or in a command terminal cd into the directory.
### Build Commands
To build a container image using the Dockerfile example from the previous section, you can use the `docker build` command:
```console
sudo docker build -t test .
```
This is an example of the docker build command in Linux requiring the "sudo" function, if you're on Windows/Mac you might not need it. The `-t test` option specifies the name of the image.
The single dot (`.`) at the end of the command sets the build context to the current directory. This means that the build expects to find the Dockerfile and the `tm-voicebox-v.3.7.4.py` file in the directory where the command is invoked. If those files aren't there, the build fails.
There are also custom-build commands used for Tape Measure but we'll get to that later on. If you want to explore every build command option outside of this basic example go [here](https://docs.docker.com/engine/reference/commandline/build/).
## Running Docker Containers
Once you successfully build your docker container you need to access or run it. This is where the run command comes in. Again, you'll have to be within the directory of your docker file for all of the following directions.
### Run Commands
To run the built container from the previous example you can use the `docker run` command.
```console
sudo docker run -it test
```
In this instance "test" is the name of the container and, again, sudo might be required if you're on Linux. If you want to explore everything docker run has to offer outside of this basic example go [here](https://docs.docker.com/engine/reference/commandline/run/).
## Packaging Docker Containers
To package a docker container and upload it into TM we need the docker image container to be compressed into a physical file instead of a container image. In order to do this we need to compile the docker container into a .tgz file. Below are the instructions to do so for Tape Measure.
### Dockerfile to .tgz
The following terminal code segments were run in a Linux system, if you're on Windows/Mac you might need to adjust some of the terminal commands, if you run into a problem message @Cai or @dwight\_2 on the discord server.
```console
sudo docker run --rm --privileged multiarch/qemu-user-static --reset -p yes
```
This command runs a throwaway container with full privileges, ensuring it has the latest qemu emulation binaries via the multiarch/qemu-user-static image. This is often used to run containers designed for another architecture (like ARM) on an x86 host which is what TM is built on.
```console
sudo docker build -t tm-voicebox-v.10.6.8 --platform linux/arm64 --build-arg BOSDYN_CLIENT_USERNAME=admin --build-arg BOSDYN_CLIENT_PASSWORD= .
```
This command builds a Docker image for arm64 called tm-voicebox-v.10.6.8, passing credentials via build arguments. The Dockerfile to build the image is expected to be in the current working directory. To get the password please contact @dwight\_2 on the RCCF discord server.
```console
sudo docker save tm-voicebox-v.10.6.8 > tm-voicebox-v.10.6.8.tgz
```
This command saves the Docker image to a portable compressed archive file for transfer or backup. The tar archive contains all the layers and metadata of the image. The archive file can then be loaded into Docker again using `docker load` on TM but more on that on the next page.
# Uploading to Tape Measure
This page showcases two ways you can upload your .tgz file into TM's core IO and how to load the container onto him.
## Wireless Uploading
TBC
## Physical USB
Frist things first make sure you have a USB big enough to store your .tgz file created previously after inserting it into your computer simply copy or move the .tgz file onto the USB. Using one of the USB slots in his core IO plug the USB into Tape Measure. Next, we'll SSH into him by running the command below:
\*Note: replace "|" with @
```
ssh -p 20022 spot|192.168.80.3
```
This is the command if TM is on his own wifi however if he's on another wifi network the IP address will need to be changed. With that being said, it'll prompt you to insert a password which, again, you'll have to ask @dwight\_2 for either on Discord or in person.
Next what you'll want to do is mount your USB. Since the core IO runs on Linux the following commands should just work when pasted in.
```
sudo fdisk -l
```
This command line lists all available USB and disk devices on TM. Once you spot your device name copy it. USB device name can look like: sda1, sda, etc.
```
sudo mount /dev/sda1 /data/usbin
```
This command line mounts the USB device sda1 to the directory /data/usbin. If you want to use a different directory make sure you specify it. Otherwise, you can create a directory by running:
```
sudo mkdir /data/usb-drive
```
This creates a new directory within data called USB-drive. Other than that just make sure you're within the directory of your USB device when running the following command line.
```
sudo docker load -i tm-voicebox-v.10.6.8.tgz
```
This loads your .tgz file as a container image on TM. That's it! Other than using the run command you've successfully uploaded the container image onto TM. Simply run your docker run command in order to access your imported container.
```
sudo docker run -it --device=dev/snd:/dev/snd tm-voicebox-v.10.6.8
```
# Example Program
This is a basic example of how custom commands are created, dockerized, packaged, and then finally loaded onto Tape Measure.
## The Python Script
## Dockerizing
## Packaging
## Loading Via USB
# Networking
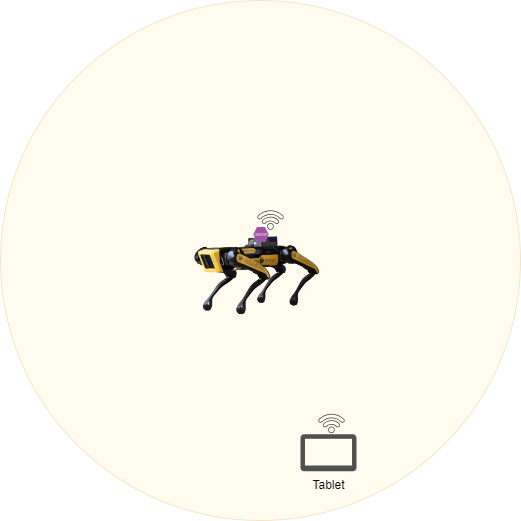
# Spot Wi-Fi Range extender
### To-Do
- Setup mesh network
- Test mesh network performance
### Parts list
- [Boston Dynamics Spot](https://bostondynamics.com/products/spot/?utm_source=google&utm_medium=cpc&utm_campaign=Utilities&utm_content=DSA&utm_term=&gad_source=1&gclid=CjwKCAiAx_GqBhBQEiwAlDNAZmFKgn9dq008_IYw5jqO6UMYI_4ExCed3PglNWcpE20F38kTri2P7BoCMHwQAvD_BwE) (If your following this guide I would certainly hope you have one or plan to get one)
- CORE I/O
- [Wireless Access Point (WAP)](https://www.cisco.com/c/en/us/solutions/small-business/resource-center/networking/what-is-access-point.html) (if your WAP has a 12v input you can use a barrel jack otherwise most use [Power Over Ethernet (POE)](https://en.wikipedia.org/wiki/Power_over_Ethernet))
- Ethernet cable (you will need 2 cables if using a POE injector)
- POE injector
- Male Barrel jack.
### Topology
#### Single node
In the single node topology you can see we have one WAP that is mounted to Spot. This outdoor AP has a much greater range than Spots regular Wi-Fi allowing for the user to control him at much longer distances.
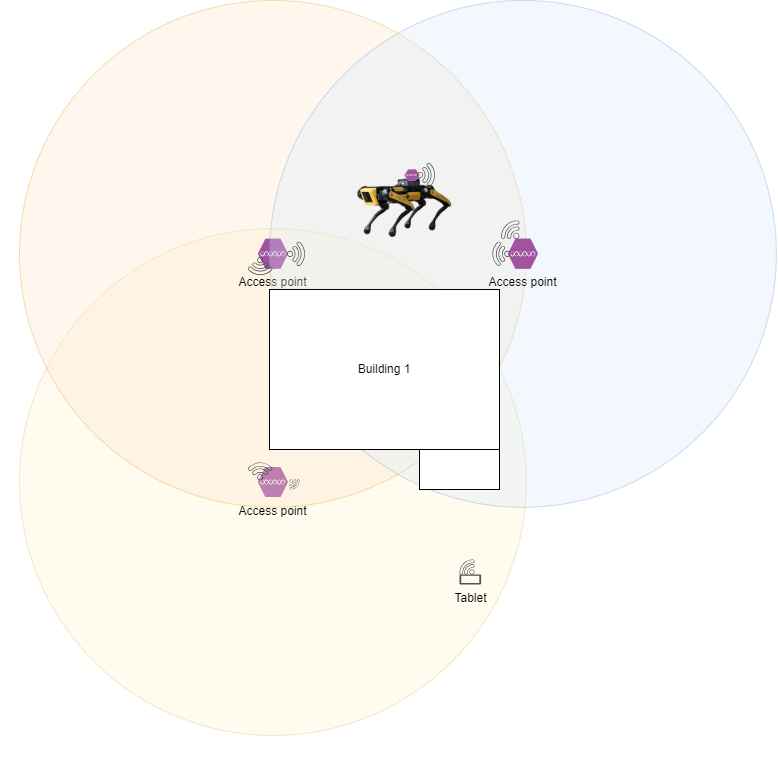
#### Multinode (mesh)
In a multinode topology we have multiple WAP's that connect together wirelessly to form [a mesh network](https://en.wikipedia.org/wiki/Mesh_networking) that cover a much larger area. In the case above we could cover the entire outside of the building without ever losing connection. This setup does include the WAP that is attached to Spot from the signal node topology because Spot will still benefit from the extra range.
This setup may not be compatible with all standard WAP's as a mesh network is often an extra feature.
### Setup
#### Spot
To configure a Spot to support either of the two setups above there is not much you need to do, however, here are a few suggested actions:
Stop spot from broadcasting his onboard network.
One way you can stop Spot from broadcasting is to change his Wi-Fi settings in the admin web portal at one of these addressees:
- [https://10.0.0.3](https://10.0.0.3) (This is the Spot network for the rear RJ45 port)
- [https://192.168.80.3](https://192.168.80.3) (This is Spot built in access point network)
- [https://192.168.50.3](https://192.168.50.3) (This is the payload network address for spot. You will only use this one if you are connected to a network port on a Spot payload)
Once you have opened up the admin portal and logged in you should then navigate to the **Network Setup** page and then **WI-FI**. You will want to change the Wi-Fi Network Type to **Client mode.****Password is provided but somebody else**
[](https://secretlibrary.rccf.club/uploads/images/gallery/2023-11/ZU1TNGSm48Iu1jIB-screenshot-2023-11-21-114321.png)
#### CORE I/O
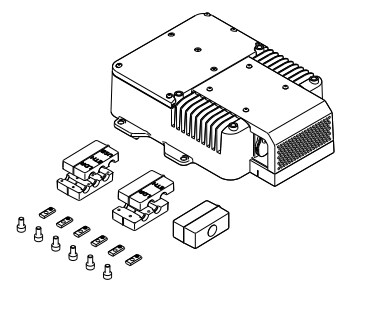
1. To prepare the CORE I/O for either of the two setups above you need physical access to the CORE I/O. You also need to have the CORE I/O mounted to Spot. You need to remove the wire cover plate to gain access to the RJ45 jacks inside. You can use either of the two ports inside.[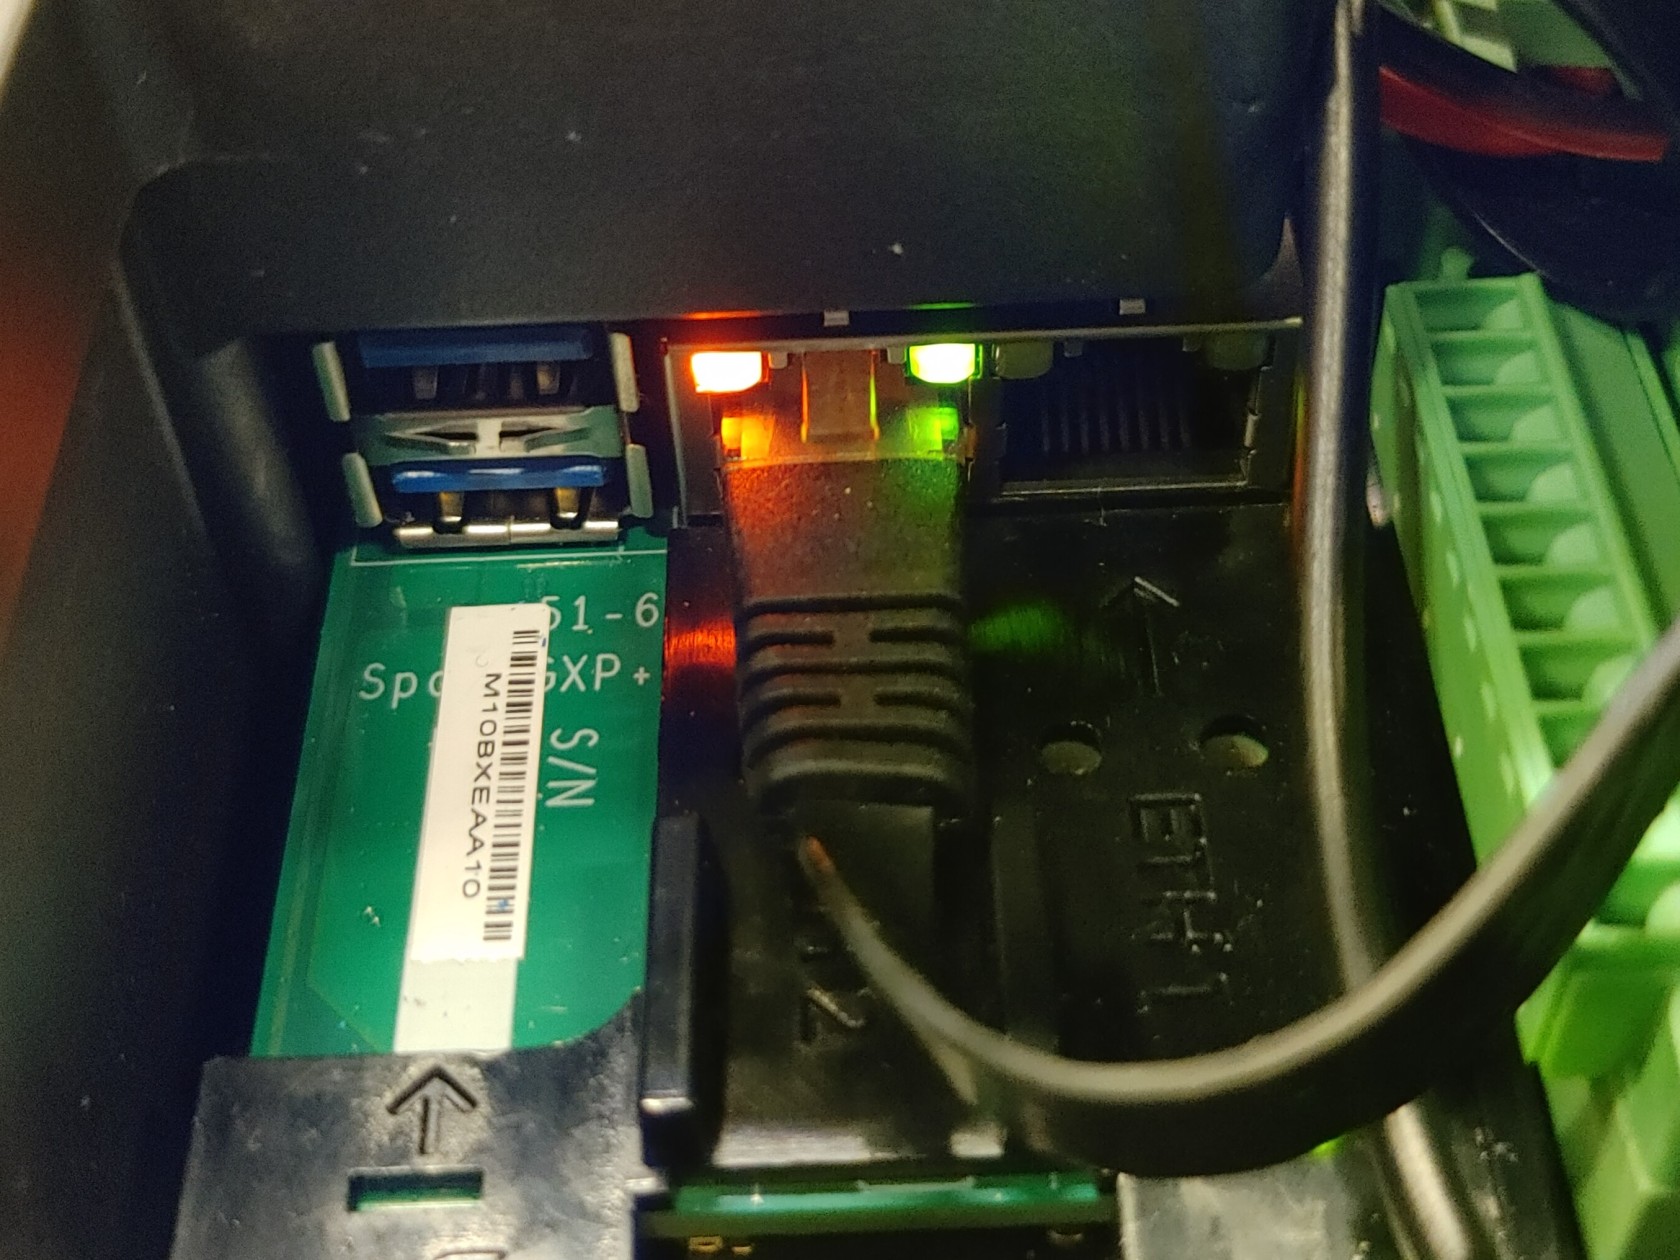](https://secretlibrary.rccf.club/uploads/images/gallery/2023-11/RIuF0IcINAhW95IS-1121231512a.jpg)
2. The second thing you need to setup is power for the WAP. You have two options:
Male Barrel Jack
If your WAP has a DC power input this would be the simplest method to power it from the CORE I/O.
[](https://secretlibrary.rccf.club/uploads/images/gallery/2023-11/P7hajrHdpOqzVHxE-rtaimage.jpg)
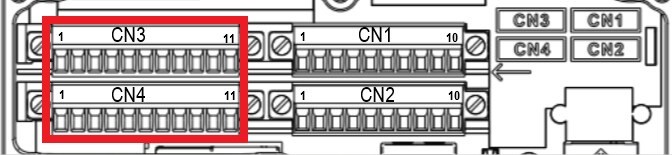
You then need to locate the CN3 and CN4 terminal blocks under the CORE I/O cover. You will use one of these to connect the WAP to the regulated power that the CORE I/O provides.
When you connect anything to the CORE I/O power outputs make sure you read the documentation!!
You will need to find the correct power outputs based on your WAP requirements. Here is a table of the connectors and their pinouts:
[](https://secretlibrary.rccf.club/uploads/images/gallery/2023-11/nukVrWC0nOgOQ4H2-image.png)
Using a POE injector
To use a POE based WAP you need determine the type of POE your your device takes. You can either have Passive or Active POE.
##### Passive POE
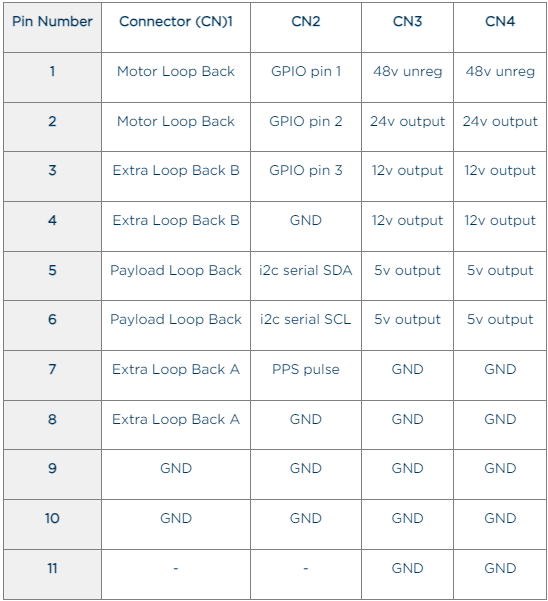
Passive POE works by inputting a specific voltage across 1 or 2 pairs of the 4 pairs of wire that make up a [CATX wire](https://support.adder.com/tiki/tiki-index.php?page=CATx+Cables). Below you can see the specification of the WAP we choose, which is 24v. There are 3 common standards for passive POE which are 24v, 48v, and 54v.
[](https://secretlibrary.rccf.club/uploads/images/gallery/2023-11/iHXWoroirg46mk22-11282313282.jpg)
After you determine what your requirements you need to find a passive POE injector such as this one that takes a male barrel jack input.
[](https://secretlibrary.rccf.club/uploads/images/gallery/2023-11/jnNumnIukldzih7v-802-3af-poe-injector-poe-splitter-gigabit-24v-48v-passive-injector-with-2-1x5-5mm-dc.jpeg)
You will to then need to provide power from the CORE I/O to the male barrel jack.
[](https://secretlibrary.rccf.club/uploads/images/gallery/2023-11/P7hajrHdpOqzVHxE-rtaimage.jpg)
You then need to locate the CN3 and CN4 terminal blocks under the CORE I/O cover. You will use one of these to connect the POE injector to the regulated power that the CORE I/O provides.
When you connect anything to the CORE I/O power outputs make sure you read the documentation!!
You will need to find the correct power outputs based on your WAP requirements. Here is a table of the connectors and their pinouts:
[](https://secretlibrary.rccf.club/uploads/images/gallery/2023-11/nukVrWC0nOgOQ4H2-image.png)
##### Active POE (Not Tested)
Active POE works by negotiating with client device, in our case the WAP, to determine what voltage and power the client needs. This is great because you can plug in any device that supports the standard used by your power device and it will automatically configure and power on. There are now multiple [IEEE standards for POE.](https://en.wikipedia.org/wiki/Power_over_Ethernet#:~:text=online.%5B24%5D-,Standard%20implementation,-%5Bedit%5D)
[](https://secretlibrary.rccf.club/uploads/images/gallery/2023-11/wn65B5CgGPbIYS32-11282313281.jpg)
You will need to find a device that takes DC input and provides at least the standard you need.
#### Wireless Access Point (WAP) setup
Going forward this setup will assume you have connected your WAP to power and connected the data cable to your laptop.
1. You will need to determine the IP address of you WAP. To do this you need will need to find the default IP address of your brand of device.
2. Once you have powered up your WAP for the first time you will want to log into the management portal. Most WAP's have a web portal located at the IP address of the device. This will be defined by default in most cases for each manufacturer, The default IP used by our device is 192.168.1.254.
- Change the SSID of your network/s
- This is so you can easily determine the in the future.
- If you have a 5Ghz network and are using the Galaxy Tab 3 active tablet you will want to disable this or name the network separately as the Tab 3 active does not support 5Ghz and it may cause connection issues.
- Change the default password for each SSID
- Please do this for security and easy of use later.
- Turn off any Band Steering functionality
- [Band steering](https://totdatacom.medium.com/wi-fi-band-steering-what-is-it-how-does-it-work-f43ae9cbb63c) can cause connection issues when in tries to force a device to the other network band and this can occur at any time.
- Change the IP assignment settings so that the WAP has a static IP in the 192.168.50.0/24 range
- You will need to change this to fit in the range of the payload network and spot uses the 192.168.50.0/24 range for payloads.
- To leave room for actual payloads and their networked devices you will want to pick a Valid IP which includes 192.168.50.10 - 192.168.50.254 Once you have logged into the WAP you want to change a few settings to make it work with Spot:
Optional WAP setting Changes
- Turn off SSID broadcasting
- This provides an extra basic level of security.
- This will require you to do a little more configuration on the Controller and other devices you want to wirelessly connect to Spot.
-
1. After Changing the IP of the WAP you will lose connection and most likely have to navigate to the new assigned address
-
# Network connection to Spot (WiFi)
#### Setting a static IP
The first thing you will need to do if you want to connect to a Boston Dynamics Spot robot is connect to the robot over the network. The easiest way to do that is to connect to the robots WiFi network. You will quickly run into an issue with connecting. most devices will state "can't connect to this network". This is because there is no [DHCP](https://en.wikipedia.org/wiki/Dynamic_Host_Configuration_Protocol) server running on the network so new devices will have no way of knowing how to talk to each other. You must set a static IP address manually.
##### Windows 11
1. Navigate to the settings on your computer. This can be found under the Windows start menu by clicking the gear icon labeled settings.
2. Select **Network & Internet** from the list on the left
3. Select **Wi-Fi,** then select **Show available networks** connect to spot, and then go back to **Wi-Fi**, from here select <**Network Name**> **properties**
4. Scroll down to the **IP assignment**, and select the **EDIT** button.
5. Change the drop-down from Automatic (DHCP) to **Manual** and toggle on **IPv4**
6. Enter the following settings:
Enter the following settings:
IP address shown is most likely already used by a device. **There must not be multiple devices with the same ip on the network at one time.**
[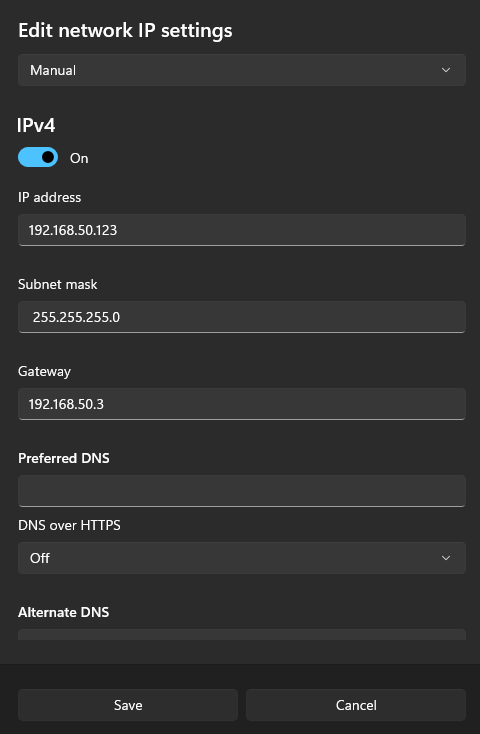](https://secretlibrary.rccf.club/uploads/images/gallery/2025-02/7W1rCs3ykl4u4d08-image.png)
##### Windows 10
1. Navigate to the settings on your computer. This can be found under the Windows start menu by clicking the gear icon labeled settings.
2. Select **Network & Intenet** from the list.
3. Select **Properties** for your Ethernet adapter. If you have multiple Ethernet adapters, make sure you are selecting the correct one! Do NOT select the WiFi adapter.
4. Navigate to the section labeled **IP settings**. You should see IP assignment is set to Automatic(DHCP)
5. Select **Edit**
6. Change the drop-down from Automatic to **Manual** and toggle on **IPv4**
7. Enter the below IP address settings